ABC Anglo Concertina Fingering Player Instructions
Credits
The visual design of the player's layout was inspired by several Anglo Concertina "Play Along" instructional videos by Ephraim Schafli.
Overview
Load, type, or paste ABC tunes and play the tunes with synchronized standard notation and Anglo concertina fingerings.
Choose Jeffries or Wheatstone concertina layouts and On-Row or Cross-Row fingering solutions.
Play tunes with synchronized notation highlighting and a fingering diagram that shows the required button and Push or Draw direction.
Edit the ABC directly, click rendered notes to locate them in the editor, and use manual tablature overrides when you want to specify particular fingerings.
Load and work with multi-tune ABC collections, save your edited ABC, and create share links for one tune or the complete collection.
Use the resizable workspace and optional full-page fingering diagram for practice on desktop and mobile browsers.
Opening and Selecting Tunes
You can start by typing or pasting a single tune directly into the ABC text area, open an ABC file containing one or more tunes, or send a set of tunes directly from ABC Transcription Tools.
If more than one tune is loaded from a file, share link, or direct transfer, choose the tune from the Tune menu.
The ABC text area accepts only one tune at a time when pasting.
If a paste would put multiple tunes in the editor, the paste is not performed and a message asks you to save the tunes to a .abc file and load that file into the tool instead.
If you have unsaved ABC changes and choose a new ABC file, the tool warns that the existing work will be lost and asks you to confirm before the new file is opened.
Concertina and Fingering Settings
Select the Concertina type (Jeffries or Wheatstone) and Fingering solution (On-Row or Cross-Row).
The button for the playing note is highlighted on its Upper Half for Push or Lower Half for Draw.
Red means Push and Green means Draw.
The bellows-direction arrow points Down for Push or Up for Draw.
These choices are remembered in this browser.
The fingering solution descriptions below are relative to C/G tuning.
On-Row:
Jim Van Donsel's original fingering solution, which favors the C-row:
Favors playing D5 and E5 on the right-side C-row.
For Jeffries-style instruments:
Favors right-side top-row 2nd button for C#5 and D#5.
Cross-Row:
A more cross-row friendly fingering solution:
Favors playing the D5 and E5 on the left-side G-row.
Favors playing C5 on the left-side G-row draw.
Favors playing B4 on the right-side C-row draw.
For Jeffries-style instruments:
Favors right-side top-row 2nd button for C#5 and D#5.
ABC Editing, Notation, and Fingering Display
The upper-left panel contains editable ABC and the lower-left panel shows the rendered notation and playback controls.
Editing the ABC rebuilds the notation, audio, and fingering solution.
Click a note head in the rendered notation to highlight it in red, select its associated note in the ABC editor, and immediately show that note's effective button and Push/Draw direction on the main Fingering Diagram without starting playback.
The complete ABC note token is selected, making it easy to replace the complete note or use Tab Override to change its fingering.
The Small / Medium / Large / Largest selector changes the ABC editor text size.
Medium is the default, and the selection is saved in this browser.
Click on any note head in the notation and then use ← and → below the instrument display to step through the notes without playback.
Resizing the Panels
On wide screens you can drag the divider between the left and right sides to resize the ABC/notation area and fingering diagram.
Drag the divider between the ABC and notation panels to resize those two panels independently.
Double-click either divider to restore that divider to its original default position.
The divider positions are remembered in this browser and restored the next time the tool is opened on a wide screen.
Click Full-Page View on the ABC, Notation, or Fingering Diagram pane to expand it to the full browser window. Click Exit Full-Page to return to the normal pane view.
Playback and Tempo
As each melody note plays, the notation cursor follows the tune and the fingering diagram highlights the required concertina button.
Red means Push and Green means Draw.
Note names throughout the tool use sharps or flats according to the tune's K: key and mode.
Check Show note in the Fingering Diagram header to display the current pitch as a quarter note on a staff centered below the bellows-direction arrow.
Use Mode to choose Show All for an animated fingering display with all buttons fully visible, Focus to fade the button board while keeping the current button, highlight, note name, staff, and bellows direction fully visible, Diagram Only to see the labeled button layout and Push/Draw legend without note highlights, note names, note image, or bellows direction, or Hide All to hide the instrument display entirely. Diagram Only is useful for practicing with the button layout as a reference without seeing the fingering solutions.
The staff notation uses the same sharp or flat naming as the displayed note name.
Playback uses the ABC Transcription Tools custom concertina MIDI program 133 for the melody, and program 0 for bass and chords, overriding matching playback directives in the source ABC.
Check Metronome to add a meter-appropriate metronome click during playback. Changing this setting stops and rewinds the current tune. The metronome setting is remembered in this browser but is not included in share links.
Check Count in? to show a five-second countdown before playback starts when you click Play while playback is stopped.
The Count in setting is remembered in this browser.
Click Mute Melody in the Notation header to mute the concertina melody. This is available for every tune, including tunes without chord symbols, so you can practice with the metronome alone. If the tune contains chord symbols, chord and bass accompaniment remain audible.
Toggling Mute Melody or Unmute Melody stops and rewinds the tune. If it was playing, playback restarts from the beginning after the five-second count-in when Count in? is enabled, or immediately when Count in is disabled. If the tune was stopped, it remains stopped.
The button changes to Unmute Melody; click it again to restore the concertina melody.
The melody always starts unmuted when the tool is opened, and the mute setting resets to unmuted any time you change tunes or load a new tune collection.
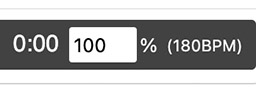
Click Tempo in the Notation header to set playback tempo from 10% to 200% of the tune's original tempo. The value is remembered in this browser.
You can also click the tempo percentage box on the playback control bar:
Tab Tools (Add Tab / Clear Tab):
The Tab Tools button beside the Tune selector opens the Tablature Tools dialog for the current tune.
Add Tab inserts below-staff ABC fingering annotations using the current instrument settings and On-Row or Cross-Row fingering solution.
The injected tablature uses the same fingering solutions as the ABC Transcription Tools.
If the current tune already contains instrument tablature, Add Tab asks for confirmation before replacing it, including any manual tab overrides.
Clear Tab removes instrument tablature annotations from the current tune only, after confirmation.
Changing the instrument type or the On-Row/Cross-Row fingering solution checks all loaded tunes for existing instrument tablature.
If any loaded tune contains tablature, the player asks for confirmation before clearing instrument tablature from every loaded tune that contains it.
Canceling the confirmation preserves all tunes and the previous instrument settings.
These changes mark the ABC as modified, so save the ABC file to keep them.
Tab Tools is available when running lessons.
Saving the ABC
Click Save to save the entire currently loaded tune collection, including edits made to any tune.
Edits are retained when you change tunes with the Tune menu.
On mobile devices, the file is saved with a .txt extension.
Share opens the Sharing Controls dialog. Choose Share Current Tune to create a share link for the currently displayed tune, or Share All Tunes to create a share link containing all loaded tunes.
The Sharing Controls dialog closes and the selected link opens in a Share Link dialog where you can copy it, save it as a text file, test it in a new browser tab, or open the ABC in the ABC Transcription Tools. Click Close to close the Share Link dialog.
The Mode display setting is a local preference and is not included in ordinary tune share links. A recipient uses their own saved Mode, or Focus if no preference has been saved.
The link includes the current Concertina type and Fingering solution. The fingering diagram always uses Button Half with Arrows.
Open in ABCTT opens the selected ABC in the ABC Transcription Tools ABC Editor in a new browser tab using the player's normal instrument-specific conversion settings. For a Lesson Share Link, lesson-only information is omitted and only the tune and applicable instrument settings are sent to ABC Transcription Tools.
A share button is disabled when its resulting link would exceed the maximum allowed of 8100 characters.
Opening a share link restores its Concertina type (Jeffries or Wheatstone) and Fingering solution (Cross-Row or On-Row), and displays the first tune encoded in the link.
Settings received from a share link are used for that visit without changing your saved preferences. If you change any player setting, the current share-link settings become your saved preferences too. Opening a file with Browse loads its ABC only and does not change player settings.
When tunes are opened from a share link or transferred directly from ABC Transcription Tools, click the Click to Enable Playback button in the playback area before using the normal playback controls.
This user action allows audio playback to be initialized on browsers that require a user gesture before starting audio.
Tab Override
To choose a different fingering, click a note in the notation and open Tab Override.
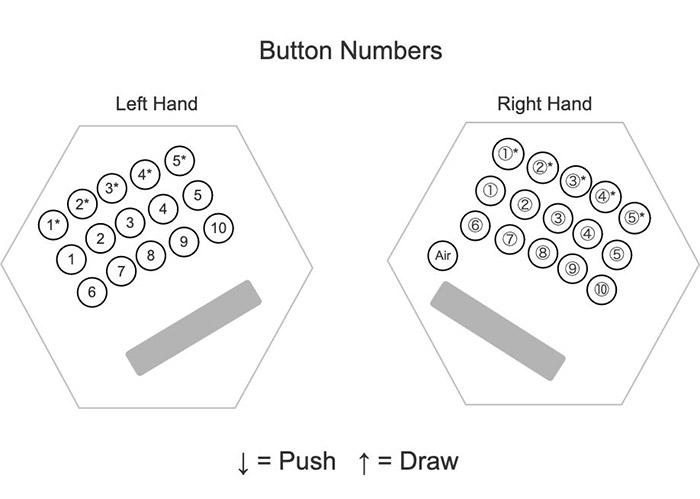
The buttons show the concertina layout. Available choices are colored Red for Push or Green for Draw; unavailable buttons are greyed out. Click an available button to set its fingering and bellows direction together.
Use ← and → to move between notes. You can drag the popover to a convenient position.
Overrides are used when you click notes or play the tune, and are retained when you save or share the ABC.
Removing the Visual Design Watermark
By default, the Fingering Diagram displays a small Visual design by Ephraim Schafli watermark in the lower-right corner.
To suppress the watermark, add nowatermark=1 to the tool URL.
For example, use ?nowatermark=1 when it is the first URL parameter, or &nowatermark=1 when other URL parameters are already present.
If the tool is opened with nowatermark=1, Share Current Tune and Share All Tunes links created from the Share dialog also include that setting.
ABC Anglo Concertina Fingering Image Generator
If you would like to export a sequence of JPEG images for each note in a tune with the same options and fingering graphics as this tool, check out the:
ABC Anglo Concertina Fingering Image Generator
Lesson Information for Music Teachers
Share opens the Sharing Controls dialog. Choose Configure Lesson… to create, edit, save, load, or share a lesson for your students.
A lesson uses the current tune only.
Enter a lesson title and instructions in the Configure Lesson dialog.
The lesson title and instructions are remembered in this browser while you work and are restored the next time you open Configure Lesson.
Save Lesson Configuration saves a reusable text file containing the current tune, lesson title, instructions, and the same player settings carried by a normal Anglo Concertina Player share link.
Load Lesson Configuration can open either a saved Lesson Configuration file or a Lesson Link saved as a text file.
Those saved player settings are Concertina type and Fingering solution.
You can also open a saved Lesson Configuration with the main ABC file Browse button. In this case, only the ABC tune is loaded; the lesson title, instructions, and saved player settings are not applied.
If one or more tunes are already loaded, the tool asks for confirmation before replacing them with the lesson tune.
Loading a lesson configuration restores its tune, lesson title, instructions, and saved player settings. The restored player settings also become your saved preferences for future use.
Unlike an ordinary tune share link, a lesson link includes the selected Mode so students begin with the intended display. Their Mode changes during the lesson are not saved as a preference.
Create Lesson Link creates a share link for the current tune containing the lesson title and instructions plus the same player settings carried by a normal share link.
The generated lesson link opens in the same Share Link dialog, stacked over the Configure Lesson dialog, where it can be copied to the clipboard, saved as a text file, tested in a new browser tab, or opened in the ABC Transcription Tools with lesson-only parameters removed. Click Back to close the Lesson Share Link dialog and return to Configure Lesson.
The Mode selector lets you choose how much help students initially see: Show All shows normal fingering highlights, note names, and bellows direction with all buttons fully visible; Focus fades the background buttons while keeping the active button and guidance at full strength; Diagram Only shows the labeled button layout and Push/Draw legend without revealing the active button or bellows direction; Hide All hides the instrument display completely. Your selection determines the starting mode in lesson links and saved lesson configurations. Students can change the mode during a lesson without affecting their normal saved preference.
Lesson Information for Students
Your music teacher may provide you with an Anglo Concertina Player lesson link.
Open the lesson link in your web browser to load the tune, lesson instructions, and the player settings chosen by your teacher.
Read the lesson information that appears, then click Start Lesson when you are ready to begin.
After clicking Start Lesson, click Click to Enable Playback to enable the audio playback controls.
The lesson setup controls and the lesson tune selector are shown at the top of the player but are initially disabled so the teacher's lesson setup cannot be changed.
The Browse and Save controls remain available while you are using a lesson, but the Share control is hidden so you cannot create share links or lessons.
You can use the normal notation, fingering diagram, playback, tempo, metronome, count-in, and full-page controls while working on the lesson.
You can edit the ABC if your teacher asks you to make changes.
Click Save to save your edited ABC.
You can use Browse to load a saved ABC file back into the player or open another ABC file. The lesson's player settings remain locked. After you load an ABC file, the tune selector is unlocked so you can select any tune in that file.
A lesson link includes the teacher's selected Mode. You may change Mode during the lesson, but these changes are temporary and do not overwrite your saved Mode preference. Outside lessons, changing Mode saves it for future visits.
Your teacher may choose the starting Mode for the lesson. Show All shows the full animated fingering display with all buttons fully visible; Focus dims inactive buttons while leaving the playing button and its guidance fully visible; Diagram Only shows the labeled button layout and Push/Draw legend without highlighting notes or showing bellows direction; Hide All hides the instrument display. You can change the mode at any time during the lesson without affecting your saved preference for normal use.
About
This tool was created by
Michael Eskin
If you find it useful, please consider a contribution via
Michael Eskin's Tip Jars